
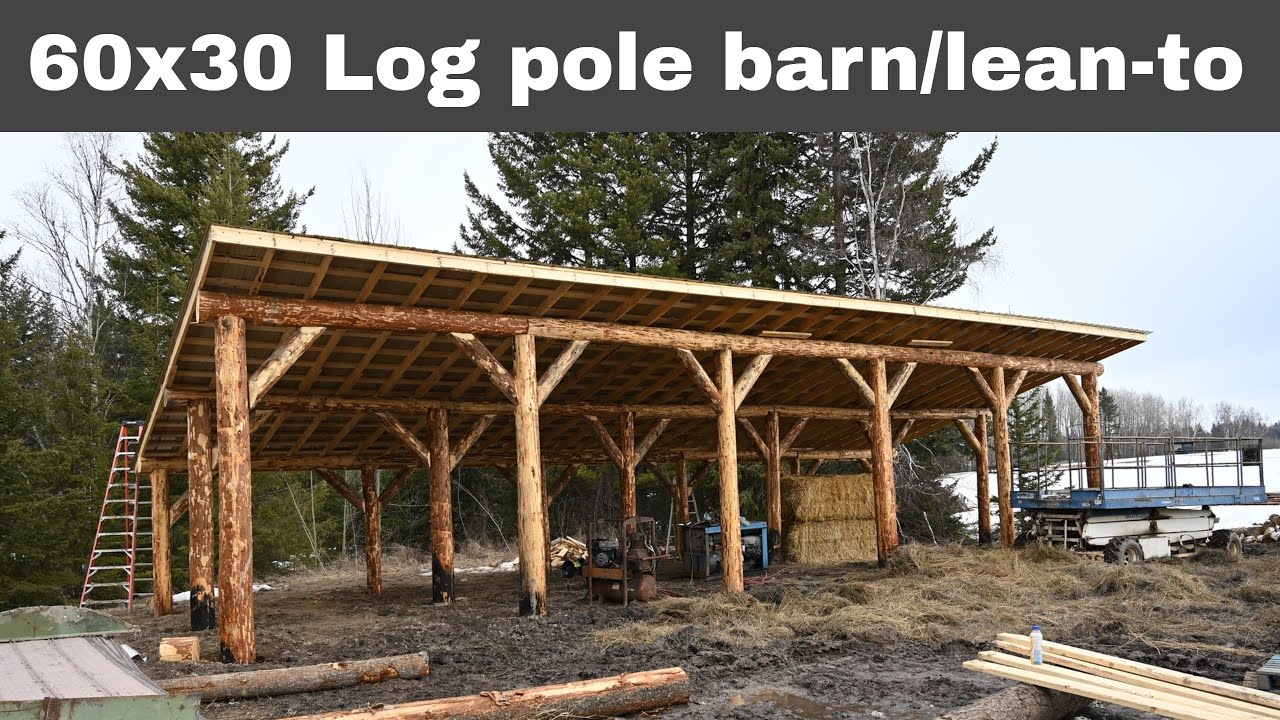
Pole barns have been around for centuries, providing an economical and practical solution to agricultural storage needs. And what better way to build one than with logs? Not only is it a sustainable option, but it can also add a rustic charm to your property. In this guide, we will walk you through the steps on how to build a pole barn with logs, from selecting the right materials to putting the finishing touches. So, let’s get started on this exciting and rewarding project!
Building a pole barn with logs is a great way to create a rustic and durable structure. Here are the basic steps:
- Select the site and clear the area.
- Prepare the logs by removing the bark and cutting them to size.
- Dig holes for the poles and set them in concrete.
- Add a roof and any additional features like windows or doors.
- Finish the interior and exterior as desired.
How to Build a Pole Barn With Logs: A Comprehensive Guide
If you’re looking for a sturdy, durable, and rustic-looking structure for your farm, workshop, or storage, building a pole barn with logs is an excellent option. Pole barns, also known as post-frame buildings, are popular for their simplicity, affordability, and versatility. By using logs as the primary material, you can add an extra layer of authenticity and charm to your pole barn. In this article, we’ll guide you through the steps of building a pole barn with logs, from planning to finishing touches.
Step 1: Planning and Design
Before you begin any construction work, you need to have a clear plan and design for your pole barn. Start by determining the purpose and size of the building, as well as the local building codes and regulations that you need to comply with. You also need to consider the site, foundation, and access for your pole barn, as well as the materials, tools, and budget you have available.
Once you have a basic idea of what you want, you can sketch a rough plan or use a software program to create a detailed blueprint. Your plan should include the dimensions, layout, and features of your pole barn, such as the roof pitch, the door and window placement, the insulation, and the electrical and plumbing systems.
Step 2: Materials and Tools
Building a pole barn with logs requires specific materials and tools that you may not have on hand. Here are some of the essential items you’ll need:
– Logs: You can use various types of logs for your pole barn, such as pine, cedar, spruce, or fir. Make sure they are straight, uniform, and free of knots, cracks, or rot.
– Posts: You need sturdy and treated posts to anchor your logs to the ground. The size and spacing of the posts depend on the size and weight of your logs and the local code requirements.
– Fasteners: You need special fasteners, such as log screws, lag bolts, or timber spikes, to join your logs together and to the posts. Make sure they are long enough and strong enough to hold the logs securely.
– Roofing materials: You need to choose a roofing material that suits your climate, style, and budget. Common options include metal, asphalt shingles, or cedar shakes.
– Tools: You need various hand and power tools to cut, notch, drill, and fasten your logs, such as a chainsaw, a miter saw, a drill, a hammer, and a level.
Step 3: Site Preparation
Before you start building your pole barn, you need to prepare the site and the foundation. Here are the steps to follow:
– Clear the site of any debris, rocks, or vegetation.
– Level the ground and mark the corners of your pole barn.
– Dig the holes for the posts and pour the concrete footings.
– Install the anchor brackets on top of the footings and attach the posts to them.
Step 4: Log Walls
Now it’s time to start building the log walls of your pole barn. Here’s how to do it:
– Cut your logs to the desired length and notch the ends to fit together. You can use a chainsaw or a hand saw to make the cuts and a chisel or a router to make the notches.
– Place the first log on top of the posts and fasten it with the log screws or bolts.
– Repeat the process for the second log, making sure it overlaps the first log at the corners and aligns with the level.
– Continue stacking the logs one by one, alternating the butt and pass corners, and checking the level and plumb after each log.
– Cut the openings for the doors and windows as you go, using a saw and a drill.
– Install the framing for the openings and fasten the doors and windows.
Step 5: Roof Structure
Once you have the log walls in place, you need to build the roof structure. Here’s how to do it:
– Determine the roof pitch and calculate the length and angles of the rafters. You can use a framing square or a calculator to do this.
– Cut the rafters and the ridge beam to size and notch them to fit together. You can use a circular saw or a handsaw to make the cuts and a chisel or a router to make the notches.
– Install the rafters on top of the log walls and fasten them with metal brackets or wooden blocks. Make sure they are evenly spaced and aligned with the ridge beam.
– Install the purlins and the sheathing on top of the rafters, using screws or nails. You can use plywood, OSB, or metal panels for the sheathing.
Step 6: Roofing and Siding
Now it’s time to add the roofing and siding to your pole barn. Here’s how to do it:
– Choose the type and color of roofing and siding that you prefer, and order the materials accordingly.
– Install the roofing materials, starting from the bottom edge and overlapping each row. You can use screws or nails to attach the metal or asphalt shingles.
– Install the siding materials, starting from the bottom edge and overlapping each row. You can use screws or nails to attach the wooden or metal boards.
– Cut the trim pieces to size and attach them to the corners and edges of your pole barn. You can use a saw and a nail gun to do this.
Step 7: Finishing Touches
Once you have the basic structure and cover of your pole barn, you can add some finishing touches to make it more functional and attractive. Here are some ideas:
– Install the doors and windows and add the hardware and locks.
– Install the insulation and the vapor barrier to make your pole barn more energy-efficient and comfortable.
– Install the electrical and plumbing systems, if needed, and connect them to the main source.
– Paint or stain the logs and the trim, using a brush or a sprayer, to protect them from weather and pests.
– Add some decorative elements, such as a cupola, a weathervane, or a sign, to personalize your pole barn.
Benefits of Building a Pole Barn with Logs
Building a pole barn with logs has several benefits that make it a popular choice for many farmers, ranchers, and DIY enthusiasts. Here are some of the advantages:
– Affordability: Logs are relatively cheap and abundant, compared to other building materials, such as bricks or stones. You can also save money on labor and equipment, as you can build a pole barn with logs using basic tools and skills.
– Durability: Logs are naturally resistant to rot, insects, and fire, and can last for decades or even centuries, with proper maintenance. They also provide excellent insulation and soundproofing, making your pole barn more comfortable and quieter.
– Sustainability: Logs are a renewable and eco-friendly resource, as they come from forests that can be managed and replenished. Building a pole barn with logs also reduces the carbon footprint and energy consumption, as it requires less processing and transportation than other materials.
– Aesthetics: Logs have a unique and rustic appearance that adds character and warmth to your pole barn. You can choose different types and sizes of logs, and combine them with other materials, such as stone, metal, or glass, to create a custom and attractive design.
Pole Barn with Logs Vs. Other Building Methods
When it comes to building a farm or storage structure, you have several options to choose from, such as:
– Pole barn with metal siding: This is the most common and cheapest type of pole barn, as it uses metal panels for the walls and roof. However, it may not be as durable or aesthetically pleasing as a pole barn with logs, and may require more insulation and ventilation.
– Stick-built construction: This is a traditional and labor-intensive method that involves framing and sheathing the walls and roof with lumber. It provides more design flexibility and insulation options than a pole barn with logs, but may be more expensive and time-consuming.
– Masonry construction: This is a high-end and durable method that uses bricks, stones, or concrete blocks for the walls and roof. It provides excellent insulation and soundproofing, but may be the most expensive and challenging method, especially for DIY builders.
In conclusion, building a pole barn with logs can be a rewarding and practical project that adds value and beauty to your farm or property. By following the steps and tips we’ve outlined in this guide, you can create a sturdy, durable, and charming pole barn that serves your needs for years to come.
Frequently Asked Questions
If you’re planning to build a pole barn with logs, you might have some questions about the process. Here are some of the most frequently asked questions:
What materials do I need to build a pole barn with logs?
Building a pole barn with logs requires a few basic materials. You’ll need logs, obviously, as well as some tools like a chainsaw, a hammer, and a drill. You’ll also need some hardware like screws, nails, and bolts. Finally, you’ll need roofing materials like shingles or metal panels.
It’s important to choose good quality materials for your pole barn, especially if you live in an area with harsh weather conditions. Investing in high-quality materials will ensure that your pole barn lasts for many years.
What are the benefits of building a pole barn with logs?
Building a pole barn with logs has several benefits. For one, logs are a renewable resource, so they’re an eco-friendly building material. They’re also very durable and can withstand harsh weather conditions. Additionally, logs have a natural insulation value, which means that your pole barn will be energy efficient and comfortable to be in.
Finally, building a pole barn with logs can be a fun and rewarding project. It’s a great way to get back to nature and create a beautiful, rustic structure that you can be proud of.
How do I prepare the site for building a pole barn with logs?
Before you start building your pole barn, you’ll need to prepare the site. This involves clearing the area of any trees, shrubs, or other vegetation. You’ll also need to level the ground and remove any rocks or debris.
Next, you’ll need to lay a foundation for your pole barn. This can be done with concrete piers, or with wooden posts set in the ground. Once your foundation is in place, you can start laying the logs for your pole barn.
Do I need any special skills to build a pole barn with logs?
Building a pole barn with logs is a relatively straightforward process, but it does require some basic carpentry skills. You’ll need to be comfortable using tools like a chainsaw, a hammer, and a drill. You’ll also need to be able to measure and cut logs to the correct length.
If you don’t have experience with carpentry, it’s a good idea to take a class or work with someone who has experience building with logs. This will ensure that your pole barn is built safely and to the correct specifications.
How long does it take to build a pole barn with logs?
The time it takes to build a pole barn with logs depends on several factors, including the size of the structure and your level of experience. In general, building a small pole barn with logs can take a few weeks to a few months.
It’s important to take your time and not rush the process, as this can lead to mistakes and safety hazards. If you’re unsure about any aspect of building your pole barn, it’s always better to seek help from a professional.
In conclusion, building a pole barn with logs can be a rewarding and fulfilling experience. From choosing the right type of wood to selecting the perfect location, there are many factors to consider. However, with proper planning and preparation, anyone can successfully construct a beautiful and functional pole barn that will stand the test of time.
One of the key benefits of building a pole barn with logs is its durability and natural beauty. Unlike other construction materials, logs can withstand harsh weather conditions and require minimal maintenance. Additionally, the unique texture and color of the wood can add a rustic and charming touch to any property.
Whether you’re looking to create a new workshop, storage space, or even a cozy living quarters, a pole barn with logs is a versatile and cost-effective solution. So why not take the first step towards building your dream pole barn today? With a little bit of research and hard work, you can create a structure that you’ll be proud to call your own for years to come.