
Are you planning to build a pole barn but struggling with the concept of squaring it? Look no further! Squaring a pole barn is a crucial step in ensuring a sturdy and structurally sound building. In this article, we will break down the steps and provide tips on how to square your pole barn like a pro.
From measuring diagonals to adjusting braces, squaring a pole barn can seem like a daunting task. However, with the right tools and techniques, you can achieve a perfectly squared building that will stand the test of time. So, let’s dive in and learn how to square a pole barn!
To square a pole barn, you need to start by marking the corners of the building. Then, use a measuring tape to measure the diagonals of the building, and adjust the corners until the diagonals are equal. Finally, use a level to make sure the building is level and plumb. Repeat the process for all corners.
How to Square a Pole Barn: A Step-by-Step Guide
If you’re planning to build a pole barn, one of the most important steps is to make sure it’s square. A perfectly square pole barn ensures that the structure is safe, sturdy, and aesthetically pleasing. In this guide, we’ll show you how to square a pole barn from start to finish.
Step 1: Measure and Mark
Before you start squaring your pole barn, you need to measure and mark the corners. Start by measuring the distance between each corner using a measuring tape. Then, mark each corner with a stake or spray paint. Make sure the corners are all in the same spot as the blueprint or design plan.
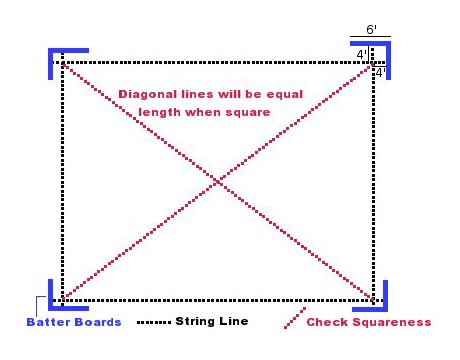
Once you’ve marked the corners, it’s time to measure the diagonals. Measure the diagonal distance between opposite corners and make sure they match. If the diagonals are not equal, adjust the stakes until they are.
Step 2: Adjust the Corner Posts
After measuring and marking, the next step is to adjust the corner posts. This is where you’ll need a helper to hold the post while you adjust it. Start with one corner and make sure the post is plumb in both directions. Once it’s plumb, secure it with braces.
Repeat this process for all four corners. Make sure the posts are all the same height and plumb in both directions. Adjust the braces until all the corners are perfectly square.
Step 3: Check the Level of the Posts
After adjusting the corner posts, it’s time to check the level. Use a level to make sure each post is level in both directions. If a post is not level, adjust it with shims until it is.
Step 4: Install the Horizontal Bracing
Once the corner posts are level, it’s time to install the horizontal bracing. This is where you’ll need a long piece of lumber and a helper. Place the lumber diagonally from one corner post to the opposite post. Use clamps to secure the lumber to the posts.
Repeat this process for the other two corners. Make sure the lumber is level and secure before moving to the next step.
Step 5: Check the Squareness Again
After installing the horizontal bracing, it’s time to check the squareness again. Measure the diagonals and make sure they’re equal. If they’re not, adjust the bracing until they are.
Step 6: Install the Roof Trusses
Once you’ve squared the pole barn, it’s time to install the roof trusses. This is where you’ll need a crane or a lot of helpers. Place the trusses on top of the poles and secure them with bolts.
Step 7: Install the Purlins and Roof Sheathing
After installing the roof trusses, it’s time to install the purlins and roof sheathing. Purlins are horizontal beams that run across the roof trusses. Use nails or screws to secure the purlins to the trusses.
Once the purlins are installed, it’s time to add the roof sheathing. Use nails or screws to secure the sheathing to the purlins.
Step 8: Install the Siding
After installing the roof, it’s time to install the siding. This is where you’ll need a lot of helpers. Place the siding on the poles and secure it with nails or screws.
Step 9: Install the Doors and Windows
After installing the siding, it’s time to install the doors and windows. This is where you’ll need a lot of helpers. Place the doors and windows in the openings and secure them with screws.
Step 10: Finish the Interior
The final step is to finish the interior. This is where you’ll need a lot of helpers. Install insulation, electrical wiring, and any other interior finishes you want.
In conclusion, squaring a pole barn may seem like a daunting task, but it’s not as hard as it seems. By following these steps, you can ensure that your pole barn is safe, sturdy, and aesthetically pleasing. So, get started and enjoy your new pole barn!
Frequently Asked Questions
Here are some common questions related to squaring a pole barn:
What tools do I need to square a pole barn?
Before starting to square your pole barn, you will need a few tools. These include a measuring tape, a chalk line, a level, and a framing square. You may also need a ladder, depending on the height of your barn.
It’s important to have these tools on hand before you start the process of squaring your pole barn, as they will make the process much easier and more accurate.
What is the first step in squaring a pole barn?
The first step in squaring a pole barn is to establish a square corner. This can be done by measuring and marking a corner, and then using a framing square to ensure that the corner is perfectly square.
Once you have established a square corner, you can use the same method to check and adjust the other corners of your pole barn, making sure that they are all perfectly square and aligned.
How do I check if my pole barn is square?
There are several ways to check if your pole barn is square. One method is to measure the diagonals from corner to corner, making sure that they are equal in length. Another method is to use a framing square to check that all angles are 90 degrees.
It’s important to check your pole barn for squareness at multiple points throughout the building process, to ensure that any issues are caught and corrected early on.
What do I do if my pole barn is not square?
If you find that your pole barn is not square, don’t panic. There are several ways to correct the issue, depending on the severity of the problem. You may need to adjust the placement of the pole barn’s posts or beams, or add additional bracing to ensure that the structure is properly supported.
If you are unsure how to correct the issue, it may be a good idea to consult with a professional contractor or engineer who can help you identify and solve any problems with your pole barn’s squareness.
Why is it important to square a pole barn?
Squaring a pole barn is important for several reasons. First, it ensures that the structure is stable and properly supported, which is essential for safety and longevity. A properly squared pole barn is also easier to work with during the building process, as it allows for accurate measuring and cutting of materials.
Finally, a square pole barn looks better and is more aesthetically pleasing, which can be important if you plan to use the structure for commercial or residential purposes.
How to Build a Pole Barn Shop – Part 4 – Building Layout with Batter Boards and String
In conclusion, squaring a pole barn is a crucial step in ensuring the structural integrity of the building. With the right tools and techniques, you can easily achieve a perfectly square pole barn that will stand the test of time.
Remember to take your time and measure twice to avoid any mistakes. Using a plumb bob and a level will help you get accurate measurements and ensure that your corners are perfectly square.
Finally, don’t hesitate to seek professional help if you’re unsure about any step of the process. With patience and determination, you can successfully square a pole barn and enjoy the benefits of a well-built and sturdy structure.