
Have you ever wondered how to maximize space in a tiny house? Building a slide out might just be the solution you need! A slide out is a practical and efficient way to add more living space in your tiny home without compromising its mobility.
In this article, we will guide you through the process of building a slide out on a tiny house. From planning and designing to construction and installation, we will provide you with all the information you need to create a functional and beautiful slide out that will make your tiny house feel more spacious and comfortable. So, let’s get started!
Building a slide out on a tiny house can create more space and functionality. Here are the steps to build one:
- Measure the space where you want to install the slide out.
- Design the slide out according to your needs and preferences.
- Get the necessary materials and tools.
- Build the frame of the slide out and attach it to the tiny house.
- Add the outer layer and insulation.
- Install the slide mechanism and test it.
- Add finishing touches such as paint or paneling.
How to Build a Slide Out on a Tiny House?
Tiny houses are trending, and for good reason. They offer an affordable and sustainable lifestyle, without compromising on comfort or style. However, one of the challenges of living in a tiny house is maximizing the use of space. That’s where slide-outs come in. A slide-out is an extension that slides out of the main structure, providing extra living space when needed. In this article, we’ll guide you through the process of building a slide-out on your tiny house.
Step 1: Plan Your Slide-Out
The first step to building a slide-out is to plan it out. You need to decide where you want the slide-out to be located and how big it should be. You also need to consider the materials you’ll use and the tools you’ll need. In addition, you should check your local building codes to ensure that your slide-out meets the necessary requirements.
Once you have a plan, you can start gathering materials. You’ll need plywood, lumber, screws, bolts, hinges, and other hardware. You should also have the necessary tools, including a saw, drill, hammer, and measuring tape.
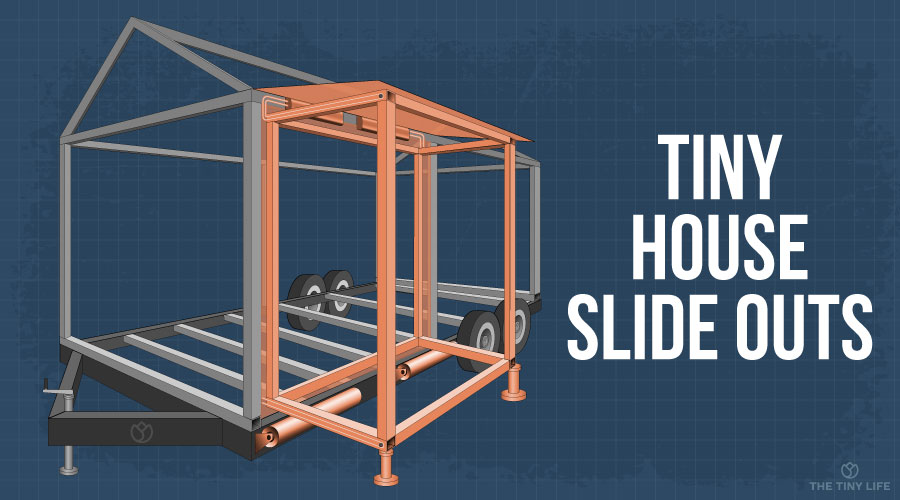
Step 2: Build the Frame
The next step is to build the frame for your slide-out. This is where your plan comes in handy. You’ll start by measuring and cutting the plywood and lumber to the desired size. Then, you’ll use screws and bolts to secure the pieces together.
Make sure that the frame is sturdy and level. You don’t want your slide-out to wobble or be uneven. You can use a level to ensure that the frame is even.
Step 3: Install the Slide-Out Mechanism
The slide-out mechanism is what allows the slide-out to move in and out of the main structure. There are several types of slide-out mechanisms, including roller bearings, ball bearings, and rack and pinion systems.
You should choose the mechanism that best suits your needs and budget. Once you have the mechanism, you can install it according to the manufacturer’s instructions. This usually involves attaching the mechanism to the frame and the main structure using hinges and bolts.
Step 4: Add Insulation and Sheathing
Insulation and sheathing are important for keeping your slide-out comfortable and weather-resistant. You should add insulation to the walls and floor of the slide-out, using spray foam or batt insulation. Then, you can add sheathing to the walls, floor, and ceiling using plywood or another suitable material.
Make sure that the sheathing is properly attached and sealed. You don’t want any leaks or drafts to compromise the comfort of your slide-out.
Step 5: Finish the Interior and Exterior
The final step is to finish the interior and exterior of your slide-out. You can choose the materials and finishes that best suit your style and preferences. For example, you can use wood paneling, wallpaper, or paint for the interior walls. You can also add flooring, lighting, and furniture.
For the exterior, you should choose a material that matches the main structure of your tiny house. You can use siding, metal panels, or another suitable material. You should also add weatherstripping and other features to ensure that the slide-out is weather-resistant.
Benefits of a Slide-Out
Building a slide-out on your tiny house has several benefits. Firstly, it provides extra living space, which is especially useful if you have guests or need more room for storage. Secondly, a slide-out can increase the resale value of your tiny house, as it makes it more attractive to potential buyers. Finally, a slide-out can enhance the overall look and functionality of your tiny house, making it a more enjoyable and comfortable living space.
Slide-Out vs. Other Extension Options
A slide-out is not the only option for extending your tiny house. You can also choose from other options, such as pop-outs, fold-outs, and bump-outs. Each option has its own advantages and disadvantages, depending on your needs and preferences.
For example, a pop-out is similar to a slide-out, but it pops up instead of sliding out. This can be useful if you have limited space or don’t want to compromise the exterior design of your tiny house. A fold-out is another option that involves folding panels that extend from the main structure. This can be useful if you want a more flexible or multi-functional space. Finally, a bump-out is a small extension that protrudes from the main structure, providing a little extra space.
Conclusion
Building a slide-out on your tiny house is a great way to maximize your living space and enhance the overall functionality and comfort of your tiny house. By following the steps outlined in this article and choosing the right materials and mechanisms, you can build a slide-out that meets your needs and preferences. Whether you’re a DIY enthusiast or a professional builder, a slide-out is a fun and rewarding project that can take your tiny house to the next level.
Frequently Asked Questions
Building a slide-out on a tiny house can be a challenging task. Below are some frequently asked questions about the process.
What materials do I need to build a slide-out on my tiny house?
The materials you will need depend on the design of your slide-out and its size. Generally, you will need wood, screws, bolts, metal brackets, and drawer slides. You may also need insulation, weatherstripping, and sealant. It is advisable to consult a professional or a DIY guide to ensure you have all the necessary materials before beginning the project.
It is also essential to use high-quality materials to ensure durability and avoid frequent repairs and maintenance. You can purchase these materials from a local or online hardware store.
How do I design a slide-out for my tiny house?
Designing a slide-out for your tiny house requires careful planning and consideration of various factors, such as the size of your tiny house, the available space, and your needs. You can use online templates or design software to create a blueprint of your slide-out. Ensure that your design allows for proper insulation, ventilation, and stability. Also, consider the weight of the slide-out and its impact on your tiny house’s overall weight and balance.
It is advisable to seek advice from a professional tiny house builder or architect to ensure your design meets safety and building standards.
Do I need a permit to build a slide-out on my tiny house?
Building codes and regulations vary by location, and it is essential to check with your local building department to determine if you need a permit to build a slide-out on your tiny house. In most cases, you will need a permit, and failure to obtain one can result in fines, penalties, or legal problems in the future. It is advisable to consult a professional or an attorney to assist you in obtaining the necessary permits.
Note that building codes and regulations are in place to ensure safety and proper construction practices. It is crucial to follow these guidelines to ensure your slide-out is safe and meets building standards.
How long does it take to build a slide-out on my tiny house?
The time it takes to build a slide-out on your tiny house depends on various factors, such as the size and complexity of the design, your level of experience, and available resources. Generally, it can take anywhere from a few days to several weeks to complete the project. It is advisable to have a timeline and a plan in place to ensure the project stays on track and is completed within a reasonable time frame.
It is also essential to allocate enough time for any unexpected delays or setbacks that may arise during the construction process.
Can I install a slide-out on an existing tiny house?
Yes, it is possible to install a slide-out on an existing tiny house. However, it can be a challenging task and may require modifications to your current design. It is advisable to seek advice from a professional or a DIY guide to ensure you have the necessary knowledge and skills to complete the project successfully.
Also, consider the impact of the slide-out on your tiny house’s weight and balance, as well as its impact on your daily activities and lifestyle.
DIY Slide Out Room – Expedition Truck Build #6
In conclusion, building a slide out for your tiny house can be a challenging but rewarding project. With careful planning, attention to detail, and the right tools and materials, you can create a functional and aesthetically pleasing addition to your home on wheels.
One important aspect of building a slide out is ensuring that it is structurally sound and able to withstand the weight and movement of your tiny house. This may involve reinforcing the existing frame or building a separate frame for the slide out.
Another important consideration is the design and layout of the slide out. It should be functional and practical, providing additional living space without compromising the overall integrity of the tiny house.
Overall, building a slide out requires patience, skill, and a willingness to learn and adapt as you go. With the right approach, you can create a custom addition to your tiny house that enhances your living space and improves your quality of life on the road.